If your water isn’t getting hot enough—or not heating at all—you might have a faulty heating element in your electric water heater. At Clog Heroes, we often receive calls from homeowners in Fredericksburg, VA experiencing exactly this issue. Before replacing your entire water heater, it’s smart to test the element to see if it’s the root of the problem.
In this blog, we’ll walk you through how to test a water heater element safely and accurately using a digital multimeter. Whether you’re a confident DIYer or just want to understand what your plumber is doing, this step-by-step guide will give you clarity.
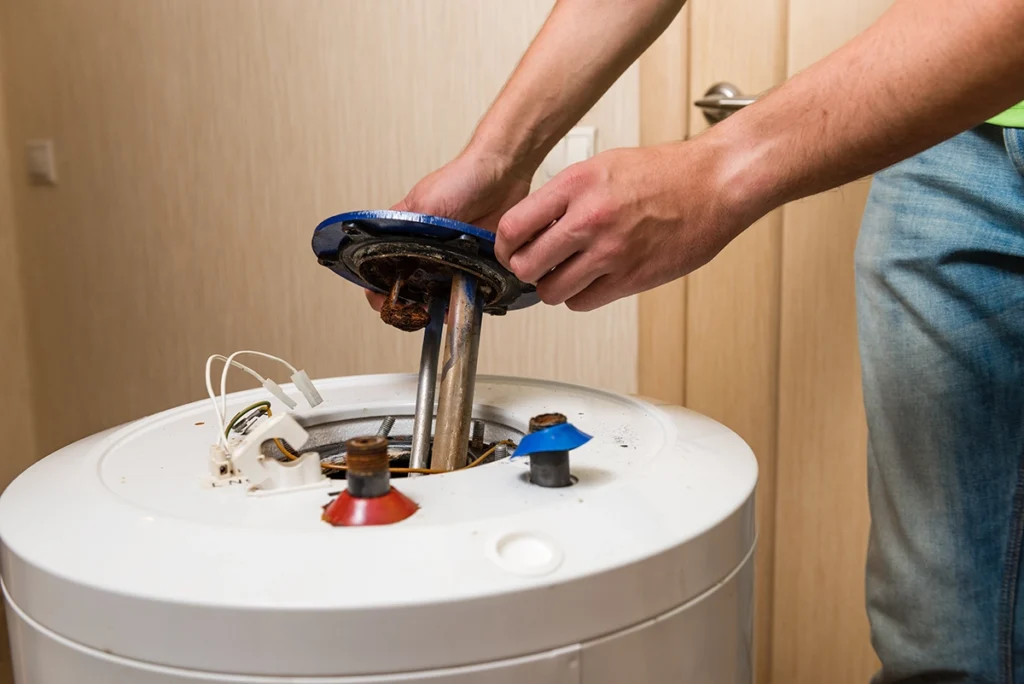
What Is a Water Heater Element?
Electric water heaters use one or two heating elements—metal rods inside the tank—that heat the water directly. These elements are controlled by thermostats and typically located behind access panels on the side of the tank.
There are two common types of elements:
-
Screw-in elements, which are the most common today
-
Flange-style elements, which are older and use a four-bolt mounting system
Over time, heating elements can burn out due to sediment buildup, corrosion, or normal wear and tear. When one fails, your water may only be lukewarm or completely cold.
Signs of a Bad Water Heater Element
Before you begin testing, look for these signs that could indicate a failed heating element:
-
Water takes much longer to heat up
-
Hot water runs out quickly
-
No hot water at all
-
Circuit breaker trips repeatedly
-
Visible signs of rust or corrosion on the tank
If you’re experiencing any of these issues, it’s time to test your water heater element.
Tools You’ll Need
To test a water heater element, gather the following tools and supplies:
-
Digital multimeter (set to resistance/ohms)
-
Screwdriver (usually Phillips-head)
-
Non-contact voltage tester (for safety)
-
Work gloves
-
Safety goggles
Always prioritize safety. If you’re unsure about any part of this process, it’s best to call a licensed plumber like the team at Clog Heroes.
Step 1: Turn Off Power to the Water Heater
This is the most important step.
-
Go to your home’s breaker panel and switch off the circuit breaker for the water heater.
-
Confirm that the power is off by using a non-contact voltage tester on the wires inside the water heater’s access panel.
Never attempt to test or touch wiring unless you’ve verified that the power is completely off.
Step 2: Access the Heating Element
-
Locate the access panel on the side of the water heater (some tanks have two—upper and lower).
-
Use a screwdriver to remove the panel cover and peel back the insulation and plastic safety cover to expose the heating element terminals.
-
Repeat the same process for the second panel if you have a dual-element heater.
Make sure everything is dry before proceeding. Moisture near electrical connections can cause false readings or unsafe conditions.
Step 3: Set Your Multimeter
-
Turn your multimeter to the ohms (Ω) setting.
-
If it’s not auto-ranging, select a range between 10 and 100 ohms.
Now you’re ready to take a resistance reading.
Step 4: Test for Continuity
-
Touch one probe of the multimeter to one screw terminal on the heating element.
-
Touch the second probe to the other terminal.
-
A working element will typically show a resistance between 10 and 30 ohms, depending on the wattage.
No reading or “infinite” resistance usually means the element is burned out and needs to be replaced.
Step 5: Check for a Short
-
Touch one probe to one terminal and the other probe to the metal base of the water heater element.
-
Repeat with the second terminal.
If you get any reading other than infinity (OL), the element is shorted and should be replaced.
Step 6: Repeat for the Second Element (If Applicable)
If your unit has both an upper and lower element, follow the same steps to test each one individually.
Sometimes, only the lower element fails, resulting in hot water that runs out quickly. Other times, both elements may need replacement.
When to Replace a Water Heater Element
If your test shows no continuity or reveals a short to ground, the heating element is faulty. You can purchase a new element from most hardware stores, but make sure the wattage and voltage match your old one.
Installation can be tricky if the element is corroded or hard to remove. You’ll also need a water heater element wrench and may need to drain the tank before replacing it.
Unless you have plumbing experience, it’s a good idea to have a pro handle the replacement. Our team at Clog Heroes in Fredericksburg can quickly and safely replace failed heating elements so you don’t have to deal with cold showers or DIY frustrations.
Preventing Future Water Heater Element Failures
Heating elements often fail due to sediment buildup in the bottom of the tank. To extend the life of your water heater and its components:
-
Flush the tank at least once a year to remove sediment
-
Check the anode rod every 2–3 years to prevent corrosion
- Lower the water heater temperature to 120°F to reduce strain and save energy
-
Use a water softener if your area has hard water
-
Schedule regular maintenance with a licensed plumber
Keeping up with these steps can help you avoid premature water heater failures and ensure consistent hot water year-round.
Trust Clog Heroes for Water Heater Repairs in Fredericksburg, VA
If your water heater isn’t doing its job, testing the heating element is a great place to start. A simple multimeter check can reveal whether the issue is a quick fix or something that needs professional attention. While the process is straightforward, it does involve working with electrical components—so if you’re unsure, it’s always best to leave it to the experts.
At Clog Heroes, we’re here to help Fredericksburg homeowners get their hot water back quickly and safely. Whether it’s a faulty element, a thermostat issue, or a deeper problem with your system, our licensed plumbers are just a call away. Don’t settle for cold showers—reach out and let us take care of it.